Explorer & editor
Browse a session's git worktree and edit files in the built-in Monaco editor, with tabs, change markers against the base branch and a Markdown preview.
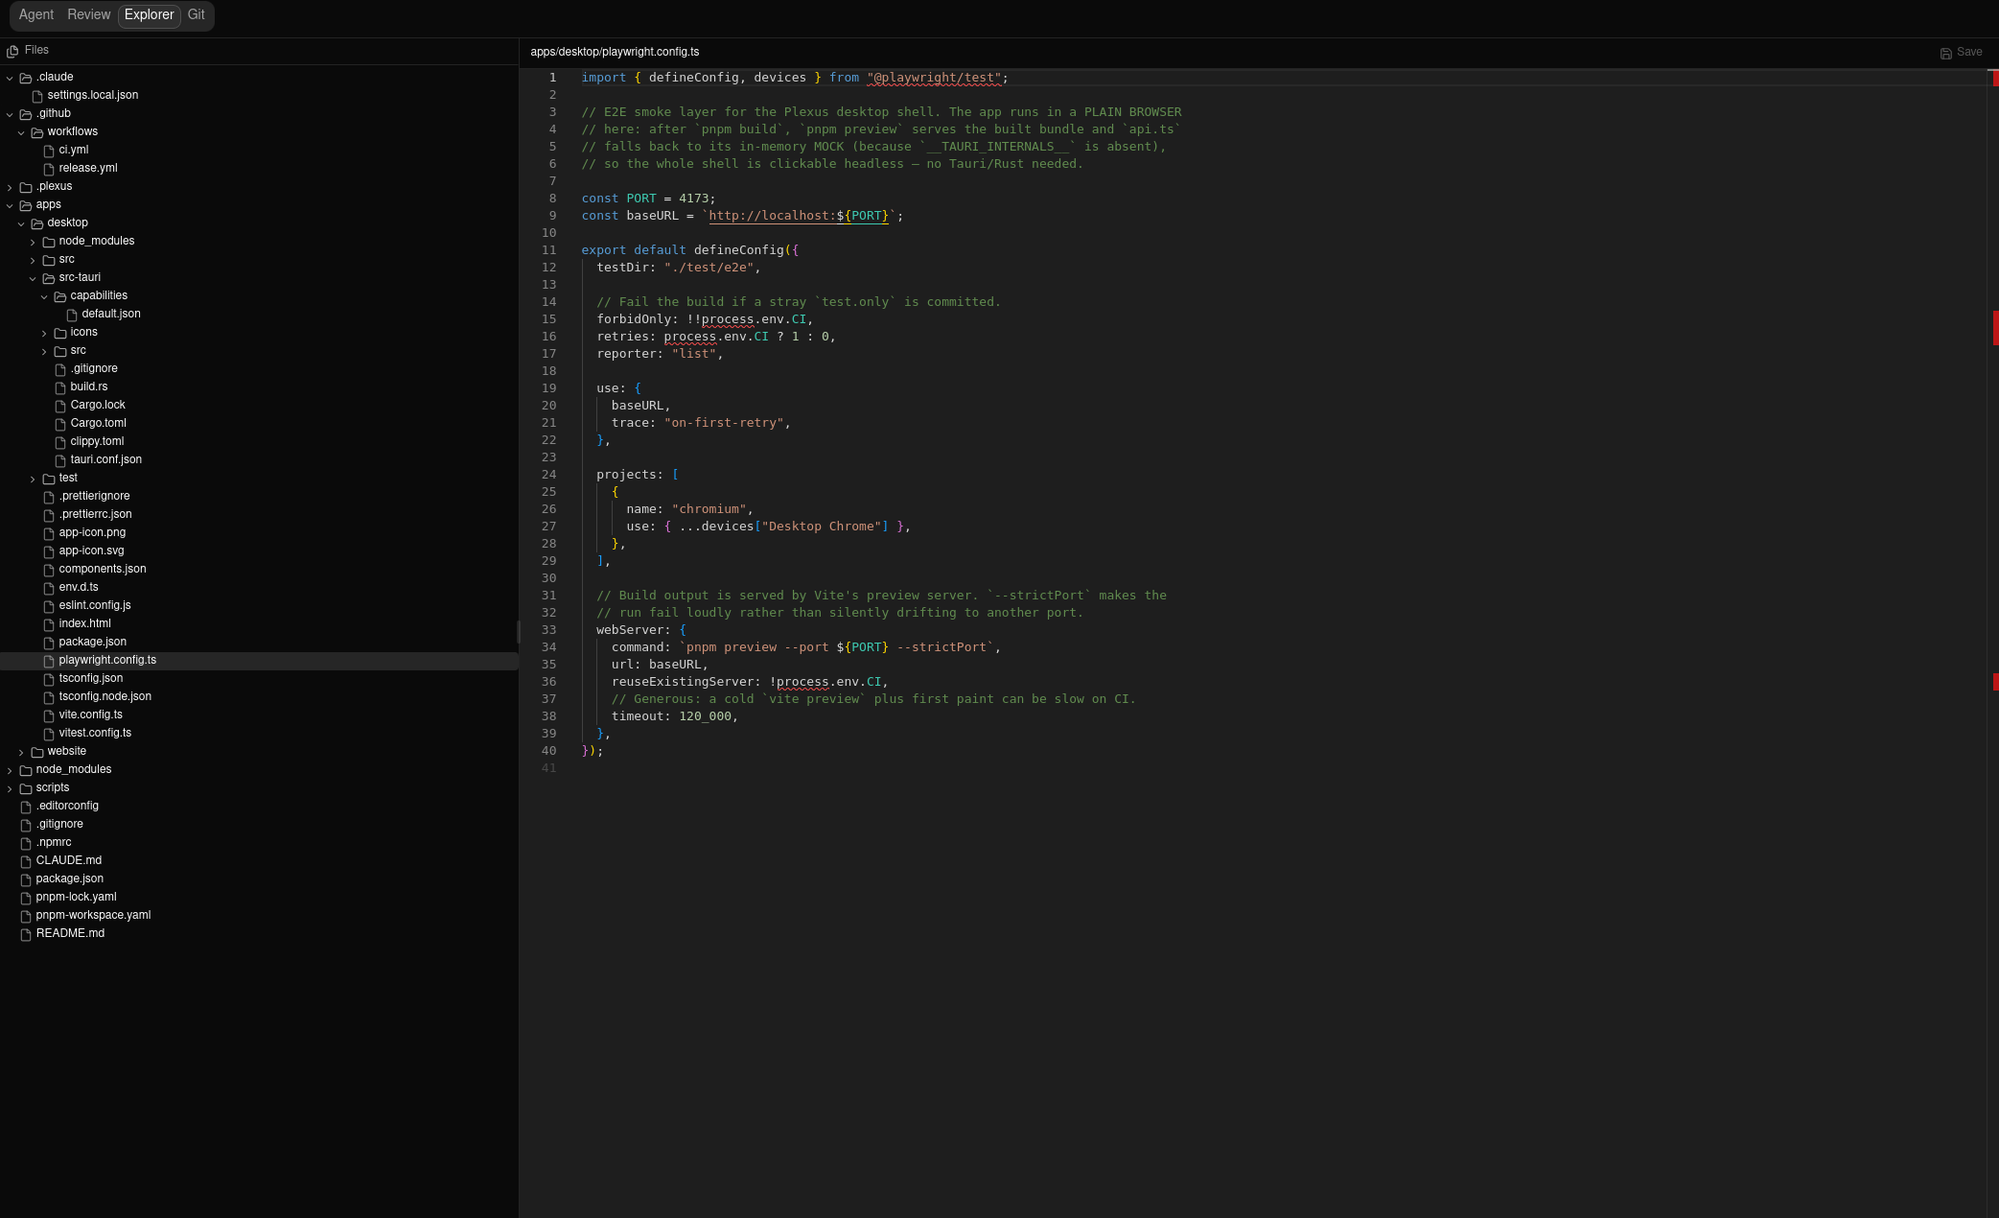
The Explorer tab is a file browser and code editor for the session's git worktree, so you can read and make quick edits to the files the agent is changing. Switch to it with ⌘3 — ⌘ is Cmd on macOS, Ctrl on Windows and Linux.
The tab splits into two resizable panes: a file tree on the left and a Monaco editor on the right.
Browse the file tree
The left pane lists everything in the session's worktree. Folders appear first, then files in case-insensitive alphabetical order, and the .git folder is hidden.
- Click a folder row to expand it. Contents load lazily on first expand — you'll see a brief spinner — then stay cached so re-expanding is instant.
- The cache refreshes quietly in the background after agent turns and git operations, so the tree keeps up with the changes the agent makes without a manual refresh.
- Click a file to open it in the editor. Each file you open gets its own tab above the editor, so several files stay open at once (see Tabs below).
- Files changed versus the branch this worktree was created from are flagged in the tree: a colored dot on the file (green added, amber modified, red deleted) and a subtle dot on any folder that contains changes — so the files the agent touched are easy to find.
The tree is read-only: there are no New File or Delete actions. New files come from saving to a path in the editor (the parent folder must already exist); deletion is done from a terminal or your usual tools. If no session is started yet, the tree shows No worktree yet — start the session to populate it.
Edit and save files
Open a file and type to edit it. Syntax highlighting is automatic, detected from the filename and extension — the editor covers around 90 languages (see Supported languages below).
Tabs
Every file you open gets a tab above the editor. Open as many as you like — clicking a file that's already open just switches to its tab, and switching between tabs preserves each file's unsaved edits, scroll position, and cursor. A tab with unsaved changes shows an amber dot; hover it and click the ✕ (or middle-click the tab) to close it. Closing a tab with unsaved changes asks you to confirm first. Your open tabs are remembered per session, so switching to another tab (Review, Git) and back — or reopening the app — brings them back.
Saving
By default Plexus saves manually: press ⌘S to write the active file to the worktree. There is no separate Save button — the tab's amber dot is your unsaved-changes indicator. Prefer to save as you go? Turn on auto-save in Settings (Editor → Save behavior → Auto) and Plexus writes each change to disk a moment after you stop typing, like PhpStorm — the dot clears on its own. You can rebind the save shortcut under Settings → Shortcuts (see Keyboard shortcuts). If a read or save fails, a red error bar explains why. The editor's colors follow the app's light/dark theme and update the moment you change it in Settings → Appearance.
Change markers
Down the editor's gutter and scrollbar, colored markers show where the file differs from the branch the worktree was created from — green for added lines, amber for modified, and a red caret where lines were removed. The editor always shows the real current file; the markers just point at what changed, so you can review the agent's edits in context. They refresh when you save and automatically after the agent finishes a turn — and in auto-save mode they track your edits almost live.
Supported languages
Highlighting comes from the Monaco engine the editor is built on, which bundles around 90 languages. Plexus picks the right one automatically from the filename and extension — files like Dockerfile are matched by name, no extension needed — so you never set a language by hand.
| Category | Languages |
|---|---|
| Web & markup | HTML, CSS, SCSS, Less, JavaScript, TypeScript, Vue, JSON, GraphQL, XML, Markdown, Pug, Handlebars |
| Systems & compiled | C, C++, C#, Rust, Go, Swift, Objective-C, WGSL |
| JVM & scripting | Java, Kotlin, Scala, Python, Ruby, PHP, Perl, Lua, R, Dart, Elixir, Clojure, F#, Julia |
| Shell, data & config | Shell / Bash, PowerShell, Batch, Dockerfile, YAML, TOML, INI, HCL, Protobuf, SQL (MySQL, PostgreSQL, Redshift) |
The table covers the common ones; the full set is whatever Monaco ships. A file Monaco doesn't recognize opens as plain text — still fully editable, just without coloring. The Review tab highlights a focused subset of these in its diffs.
Preview Markdown
Open a Markdown file (.md, .markdown, .mdown, .mkd) and three view buttons appear above the editor:
| View | Shows |
|---|---|
| Source | The raw Markdown |
| Preview | The rendered HTML |
| Split | Source on the left, live preview on the right |
In Split view the preview reflects your unsaved edits as you type, so you see the rendered result before saving. Relative links and images resolve against the worktree, and external links open in your browser. The view resets to Source when you switch to a different file.
Limits and unsupported files
| Situation | What you see |
|---|---|
| File larger than 1 MB | A File too large notice with the byte size, instead of the editor |
| Binary file (contains null bytes) | A Binary file notice — it can't be shown or edited |
These limits keep the editor responsive and apply to the Markdown preview as well.
Layout
Drag the divider between the tree and the editor to resize the panes, and the divider between editor and preview in Split view. Pane sizes are remembered between visits.